December’s competition topic will be “Street Photography”. A number of us are wary of approaching complete strangers and taking their pictures, feeling intimidated at provoking people with unwelcome breaches of privacy. Well, there are ways to minimize the provocation, and perhaps leave them none-the-wiser, while getting the shots you want. Here I researched gear and settings that should get you started.
One member of our club, initials “MK”, has perhaps the least suspicious approach of all. He frequently approaches his quarry using his cell phone’s camera, however, he cleverly has the earbuds in his ears and plugged into the phone so as to appear to be just perusing his music. With cell phones being ubiquitous, people just don’t notice.
But say that you want a bit more control over your image than a cell phone provides, getting more pixels and RAW data as well. In that case you’ll want to use your DSLR. I found a few sites that talk to gear and settings that can help you get under-the-radar. The first one talks to locations, subjects, gear, and settings. The second one is almost entirely about selecting a camera and lens. The third is about avoiding some newbie mistakes. You’ll see some differences in these articles. The first two provide gear and settings that minimize your intrusiveness. The third article says that it is a mistake to avoid the thick of the crowd because that is where the best shots are.
The first article also talks to locations in New York City for good opportunities, but pay attention to why these are good locations. The same principles apply to other cities.
A few of the key composition-related points are:
• Use your eyes, not your viewfinder, to find your most interesting subjects.
• Find busy street corners, and let the people come to you.
• Wander.
• Just ask people if they mind if you take a street portrait for your project. Many will be happy to accommodate.
Regarding gear, any camera will work, but large cameras and lenses are off-putting, and are not ideal. The second article provides a street photography saying: “Creepiness is proportional to focal length.” Use a smaller camera and smaller (prime) lenses, if possible. A 35 mm equivalent prime lens for a full frame is almost perfect (e.g. 17 mm focal length on micro 4/3 camera, or 23 mm focal length on an APS-C camera), providing a ~54 degree horizontal field-of-view, and a ~38 degree vertical field-of-view. This is wide enough to capture your subjects without being too careful, and narrow enough to not require extensive cropping later.
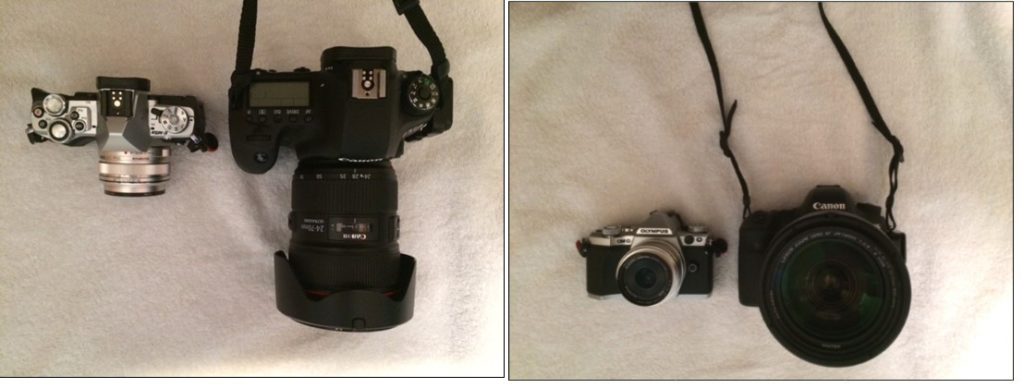
Here is a comparison of my micro 4/3 camera with a 17 mm prime lens (35 mm full frame equivalent), and my full frame DSLR with its 24-70 mm zoom.
Adjust the settings so that you don’t need to touch them – much. The goal is a large depth of field and fast enough shutter speed to freeze movement. To get this you’ll need larger ISO than you might typically choose.
• Fix the ISO between 800-1600 for daytime, and 1600-3200, or even 6400, for night. Caution, ISO 6400 can be very noisy (it is particularly bad on my Olympus OM-D).
The two articles suggest a couple of camera mode to use.
• Set the camera to Shutter Priority (“S”), with the shutter speed between 1/320th or 1/250th of a second, or as slow as 1/125th if it is dusk or night. The resulting aperture should be at least at f/8, and ideally between f/11 and f/16.
• Set the camera to Program mode (“P”), and allow it to make the selection. You still want the same ranges of values for shutter speed and aperture as for the Shutter Priority approach.
Optional Zone Focusing: Turn the autofocus off and have the camera pre-focused to 2.7 or 3 meters (8.75-9.75 feet). This presumes that your subjects will be roughly within that range. Adjust with the lens focusing ring accordingly (closer or further away) as you come across transiting subjects. This approach obviates the need to focus the camera through the viewfinder (or screen). And with the good depth-of-field that you’ve achieved in you aperture settings, an accurate focal point won’t be essential. Of course, turn on autofocus to capture scenes where nothing is moving.
If you don’t fancy turning the autofocus off, using it is just fine. You might consider using some other features of your camera’s focus settings than you currently do. See your manual.
And try anything new out before you hit the pavement!
First Article:
A Guide to New York City Street Photography (Tips and Locations)
Second Article:
http://erickimphotography.com/blog/the-ultimate-beginners-guide-for-cameras-in-street-photography/
Third Article:

