Next month’s competition is “Macro (not Floral) Photography”. Macro photography might be new to some of you, or you might not have the gear you’d like to have for the images you want. In this feature I’ll talk about a few approaches to taking macro photographs with the intent of making you aware of some of the alternatives.
Macro Lenses
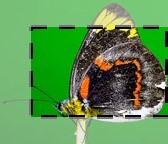
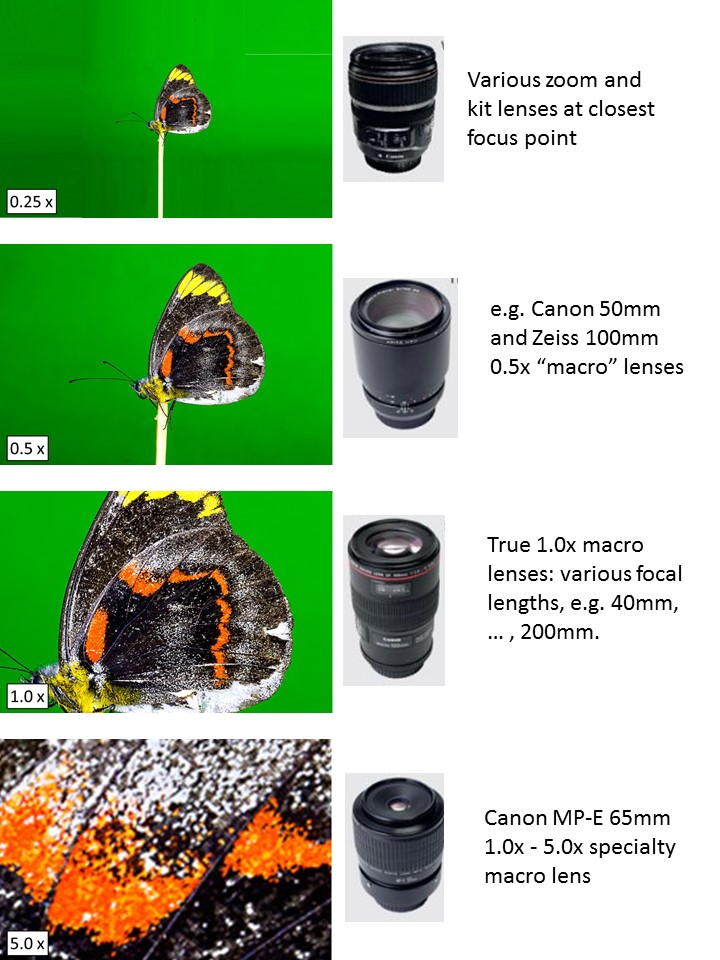
So, first off, what is a macro lens? The official definition of a macro lens is that it should be able to reproduce a life-sized image of an object on the image sensor. A “full-frame” DSLR has a sensor of dimensions 24mm x 36mm (0.94″ x 1.4″). So, if you have a butterfly with physical dimensions 1.5″ x 1.8″ (encompassing antennae, wingtips, and feet), then a life-sized macro image would place the butterfly on the smaller sensor somewhat like this:
True macro lenses offer a magnification factor of 1.0x or 1:1 at their closest focus settings, i.e. “life-sized”. There are other lenses reasonably referred to as “macro” that range from 0.5x to 5.0x. Various “zoom” or kit lenses (that over-advertise themselves as “macro”) offer only 0.2x – 0.3x at their closest focusing point, and are not too useful for filling the sensor with a small subject.
For the above lenses, there is a wide variation in minimum focusing distances that produce the same size subject images. Short focal length lenses will include a wider swath of (out-of-focus) background than long focal length lenses with their narrower field of view. If you investigate these lenses, you may see both MFD (Minimum Focusing Distance) and MWD (Minimum Working Distance) specified, or usually just MFD. MFD is the distance between the sensor and the subject. Minimum Working Distance is the distance between your lens’ front element and your subject when the lens is set at 1:1 magnification. For long focal length lenses, the long lens itself can eat up half of the MFD, and the MWD is a much better indicator of the space you have to work with. Also, the MWD does not include lens filters or the lens hood, so if you are using these your effective MWD will be smaller.
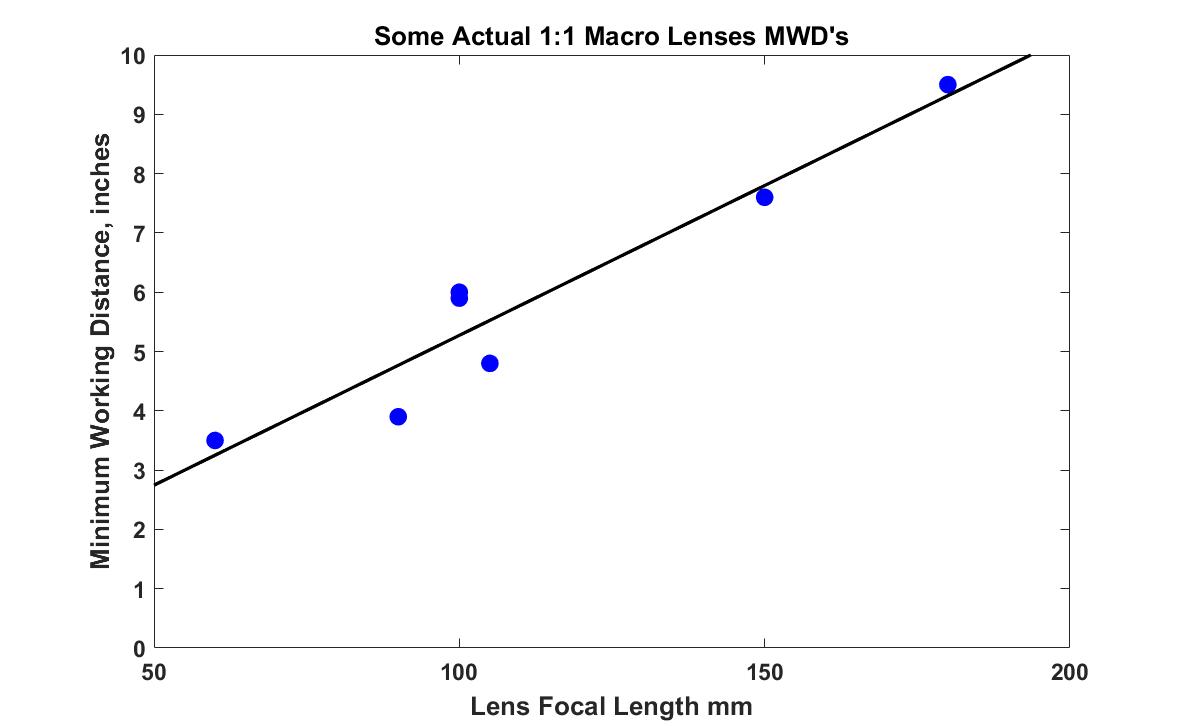
The following graph shows, for a set of 7 macro lenses from Sigma, Canon, and Tamron, the Minimum Working Distance versus lens focal length. If you are interested in the Nikon lineup, a list of their MFD’s (not MWD’s) is provided here: http://www.nikonusa.com/en/Learn-And-Explore/Article/gnhy8b3m/Macro-Lenses.html. This graph shows that your working distance will be in the range of only ~3.5″-10″, no matter what lens you own, but if you need ~10″, you had better have a long focal length lens.
In the above discussion I showed you a 5.0x simulated example for the Canon MP-E 65mm 1x-5x macro lens, which I believe is a one-of-a-kind lens. Pretty exciting, isn’t it? I am compelled to warn you about using this lens though! (read more)
If you are interested in floral macro photography, using longer lenses will allow you to back up a little, which can help with your tripod setup and other logistical issues. Much of the time, a standard macro lens, such as a 100mm focal length, will be perfect. If all you are doing is taking macro shots of watch parts and similar inorganic still lifes, the focal length won’t matter as much and shorter lenses won’t penalize you. Generally, shorter lenses are much less expensive than the longer lenses.
Now lets consider the case when your subject is skittish. A 60mm macro lens, a 100mm macro lens, and a 200mm macro lens will all produce the same sized image of the butterfly at their closest focus distance. But if the butterfly is active, you could very well get the shot with a 180-200mm macro lens (working distance of ~10″), but no way with the 60mm (working distance ~3.5″)! But, say you don’t have the $1,400 to shell-out for a Canon 180mm f/3.5 macro, or $1,800 for a Nikon 200mm f/4 macro? (this is where I am, myself)
You should recognize that the best images will result if you use a genuine macro lens, of course. One factor is field curvature. Macro lenses are designed with a flat-field focus where everything in a flat plane is in focus. Everything in the image that is in that plane is equally sharp from edge to edge. General purpose lenses are not designed this way, and the focused surface is closer to a sphere, not a plane. The center of the image is in better focus than the edges, so the edges are softer. Normally the DOF is broad enough that you won’t notice the effect at the edges of your images at the larger distances where you are using these lenses. But, if you employ add-on equipment to use these lenses close up for macro, the field curvature will be a con unless you use focus stacking of multiple images.
Using Your Non-Macro Lenses for Macro Photography
There are other approaches to increasing lens image magnification and closer focusing distances with your existing lenses that result in life size (or larger) subjects on your camera’s imaging sensor.
You might consider less expensive extension tubes, close-up lenses (filters), teleconverters, and reversing rings, How do they work, and what are the pluses and minuses? Here is an excellent article at Cambridgeincolour.com that talks to all of these, (read more).
I personally decided to try out extension tubes, since they were inexpensive. I’ll provide more details for my calculations and testing at the bottom of this article.
Dealing with Depth of Field
Since DOF (Depth of Field) is so shallow at near-life-size (1:1) magnifications, very narrow apertures are often used to keep as much of the subject in focus as possible. And since diffraction begins to reduce image sharpness at and beyond the camera’s DLA (Diffraction Limited Aperture), the aperture chosen for the best results often ends up being a compromise between necessary DOF and desired image sharpness (e.g. f/12 – f/16).
Shallow depths of field aren’t too much of a problem when shooting flat two-dimensional objects, but focus becomes challenging when you subject has depth. DOF’s can be as small as between fractions of a millimeter and several millimeters. Because focusing is so critical, you’re usually better off switching to manual focus, so you can focus on exactly the part of the object you want to be sharp. A tripod is frequently necessary, as your ability to hand hold a camera to ~1 mm of depth tolerance is unlikely. Focusing rails are useful when your subject can’t fly away.
Fixing the camera in place and using Live View is helpful, as you can select a magnified view on the camera’s LCD for high-precision focusing.
Because small apertures are frequently used in macro photography, adequate light becomes an issue. You have three choices: slower shutter speeds, flash, or higher ISO. Slower shutter speeds will necessitate using a tripod. (the tripod will be valuable to controlling your focus point, as well with the narrow DOF’s). But, moving subjects will limit the shutter speeds, and you don’t want noticeable noise from high ISO’s, so that leaves flash to solve many situations.
Lighting
With the small effective apertures, you’ll need to provide additional light, e.g. a flash. However, a general purpose shoe-mounted flash may not always work very well. The lens itself can get in the way of a shoe-mounted flash’s beam pattern, shadowing the subject (especially at the smaller minimum working distances). Lens-mounted flashes are designed for macro. There are also ring lights and flash brackets. You can also use hand-held LED panels, or reflectors when you are outside.
Focus Stacking
Focus stacking is a technique that uses specialized software to combine multiple images taken at different focus points throughout your subject. This technique will work with multiple images taken by general purposes lenses and wide apertures, or the potentially large numbers of images taken with your macro lens, infinitesimally advanced through a tiny subject.
The first step is to march through your subject at increasingly distant focus points, capturing images along the way. The number of images required depends on how deep your subject is (front-to-back, away from the camera lens), and the depth-of-field you are achieving with your choice of aperture and macro lens. If your depth of field is a scant 1 mm, and your subject is 100 mm deep, then you will need at least 100 images, depending on the amount of focus overlap you want between images. You can control the focus points either by moving the camera itself, leaving the lens focus alone, or by adjusting the focus of the lens, leaving the camera stationary.
If you are taking more than a few images, you may want to use a focusing rail, and use the threaded screw knob to control the adjustment steps of moving the camera. You can also purchase a product like Helicon Remote, and it’s matching product Helicon Focus to do the whole job. Helicon Remote will control your camera’s autofocus and take the several or dozens of images required to march through your subject with the step sizes required to maintain sharp focus throughout. You can also use it to control an automated focusing rail to move the camera instead of adjusting the autofocus. The automated focusing rail systems can be fairly expensive, but if your macro lens does not have an autofocus, this may be the only option for automation.
Once you have your pile of images taken at different focus points throughout your subject, there are a number of software products that will combine them into a single focused image. One that you might have already is Adobe Photoshop. Others include Helicon Focus, CombineZP, and Zerene Stacker. You can find reviews of all of these on the internet.
I’ll include an example I did recently, right after I bought Helicon Remote and Helicon Focus. I used a small pile of Canadian coins on a towel, and set up my Canon 6D with 100 mm f/2.8 macro lens on a tripod at a low angle. I wanted only a portion of the first coin to be in focus when I started. I used Helicon Remote’s set up panel to select the front and rear points on my coin pile from a handy on-screen Live View image, and the software figured out what to do. It captured 43 raw images (I had previously set up raw images in my camera’s preferences). Helicon Focus works just as well on jpg images.
I was very happy with the result! In hindsight, since the front edge is a bit out of focus, I should have opened up my composition in front, and started the focusing in front of the coins. I could have cropped the front off later if I wanted to. Helicon Focus has three methods to try, depending on image content, and the instructions suggest trying all three and picking the best one. This result used their “Pyramid” method (best with sharp edges and high-contrast), while the other two methods utterly failed.
I cannot improve on the excellent article on focus stacking provided, again, by Cambridgeincolour.com:
http://www.cambridgeincolour.com/tutorials/focus-stacking.htm
This article touched on a number of gear-related subjects dealing with macro photography. I hope that it was useful. There is much more out there on each topic I covered, as well as practical advice for setting up in the field, composing your images, preparing dead bugs, and a million other things.
Extension Tubes
An extension tube is a hollow cylinder that is attached between your camera and lens, causing the lens to be further from the sensor. This extension allows your lens to focus at closer distances to the subject, which results in more effective magnification. Extension tubes don’t add any glass, so there is no flare, distortion, chromatic aberration, or any other glass-related degradation. They are relatively inexpensive. They do reduce the amount of light on the sensor, and result in a lower effective aperture than is indicated. They also prevent your lens from focusing at large distances. When purchasing extension tubes consider the electrical connectivity between your camera and lens. Not all extension tube models provide the capability for the camera to “talk to” the lens. Also consider build quality. Some brands are notoriously cheaply made.
An extension tube increases lens magnification by an amount related to the extension tube length relative to the lens focal length. For example, adding a 25 mm extension tube to a 50 mm lens will give a magnification gain of ~0.5x over what the lens provides on its own. Therefore, if the lens’s original magnification was 0.15x, then the new magnification will be ~0.15x + 0.5x = 0.65x. The minimum focusing distance will also decrease. If you would like a calculator to see how extension tubes will work with your lenses, try this out: https://www.kielia.de/photography/calculator/ . There are other tabs on this page that use simple thin-lens theory to approximate what goes on. These are the basis of the calculator. The author shows how well this works for real world lenses under the “Accuracy” tab. You will see that a lot of the time, it works very well, and sometimes not so well.
One can buy a set of three well-made, inexpensive Kenko extension tubes (12 mm, 20 mm, and 36 mm). Let’s stack them together (you can do that). We now have a single 68 mm extension tube. Lets mount this between our camera and, say, my 70-200 mm f/2.8L telephoto lens. I measured my Canon 70-200 mm f/2.8L telephoto to have a maximum magnification of 0.16x at 200 mm, and nearest focus point is ~1200 mm from the front of the lens (1443 mm from the sensor). Using the calculator in the above link, I find that the extension tube increases this to 0.54x at an MFD of 0.879 m, or 34.6″. It isn’t terrible, but it isn’t life sized. But, you could do a decent job with 0.54x and some cropping. Note how extension tubes provide relatively poor magnification when used with telephoto lenses.
The 34.6″ was the Minimum Focusing Distance, not the Minimum Working Distance. We need the MWD to know how much space we have between the front element of the lens and our bug.
Take the “measured” LL (Lens Length), add the extension tube length L, and then the lens mount imaging sensor-to-electrical-contact distance (ISCD) to get the distance from the sensor to the front of the lens. The ISCD value is 1.4″ (36.4mm) for the Canon EF and EF-S lens mount. The Nikon F lens mount ISCD value is 1.6″ (40.5mm). Subtracting the total imaging sensor to end-of-lens distance from the MFD provides the MWD for the lens at MFD:
MWD = MFD – LL – L – ISCD
You are going to hate me, but if you use the manufacturer’s specification for lens length, instead of a measured value, you have to adjust it:
To use the manufacturer-provided lens length (mfgLL) in the above formula, the electrical contact extension length from the lens mount must be added to the imaging sensor-to-contact distance (ISCD) in the formula. This distance from the sensor to the rear of the lens mount is called the flange focal distance (FFD) and is what now gets plugged into the formula instead of the ISCD. The distance from the back of the Canon EF and EF-S lens mount to the contacts is 0.3″ (7.6 mm), giving it an FFD of 1.7″ (44 mm). The distance from the back of the Nikon F lens mount to the contacts is 0.24″ (6 mm), giving it an FFD of 1.8″ (46.5 mm).
The new formula using flange length is:
MWD = MFD – mfgLL – FFD – L
For the above example, MFD = 879 mm. mfgLL = 199 mm. FFD = 44 mm. L = 68 mm.
Plug these in, and MWD = 568 mm, or 22.4″.
Testing It
I own the three Kenko extension tubes and the Canon 70-200 mm f/2.8L lens, so I tried it out, and combined all three to get 68 mm of extension. I used a ruler as my subject so that I could measure the subject’s physical size when it filled the sensor image. I got a MWD of 16.6″ from the front element of the lens to the ruler, not 22.4″. I viewed the distance across the ruler from sensor edge to sensor edge, and saw it was 2.66″. My actual sensor size is 1.4″, so the magnification is 1.4/2.66 = 0.53x, exactly as calculated. The MWD is 5.8″ shorter than calculated. I measured the lens/extension tube combination length, and saw that the calculation using the manufacturers’ specifications is right. The only thing that could be wrong is the calculated MFD. Working backwards, the MFD would have to be 29″, or 733 mm, not 879 mm.
Obviously there is a difference between the assumptions behind the model used in the lens calculator and my actual lens. The magnification calculation was spot-on.


